


This year I bought myself a Happy Planner. I chose it because I like the disc system that will allow me to add pages. I planned to add brainstorming pages to keep track of my ideas for this blog and my YouTube channel. I also planned on punching some of my art journal pages and putting it into my planner to inspire me and show off my art. Then I was simply going to use the Happy Planner as a functional planner. I loved the stickers you could buy and the notion of decorating/creating a theme. But I was NOT going to spend my art budget on those. I had a whole room full of art supplies. Then over the Christmas holidays in some downtime I watched a couple planner spread videos and it happened. I had the thought. ” I can use this” ” I bet this would work” And I was off.
I decided that I would decorate my planner , but I would challenge myself to use supplies already in my art journaling/mixed media stash . I would also try to use art journaling/mixed media techniques.
Well its been almost 2 months now and I am loving designing my weekly spreads and then using my planner. I’ve made videos of each weekly spread where I promise to include at least one new mixed media supply use or technique.
In this blog I will list 5 of these techniques/ use of materials and link you to the weekly spread video. I’ve put the link to the supplies I used in these 5 Planner Hack ideas .
1.Gelli prints or papers with left over paint cut into sizes of box or strips.


Select your color scheme and either use double sided tape or glue stick to adhere to page. I edged the boxes with my Stabilo All Pencil, but you can use Neo Color II or any watercolor pencil. Rub with finger to smudge or activate with a bit of water on a round paint brush. You can leave these blank or you can print motivational quotes on them with Micron pen, White Uniball Signo or Posca Pens. If the color on the gelli print is light enough you can plan on it, but if the color is dark or extremely busy it may just be used to add color to your spread.
2.Distress Ink applied with Ranger Blending tool through a stencil .
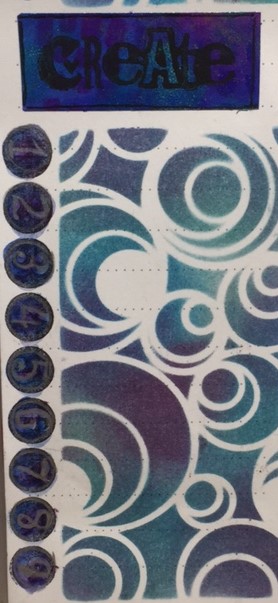

I created a template of the different size squares that I wanted to use by using exacto knife and a sheet of mylar. I punched the template with my Arc Paper Punch ( similar to Happy Planner punch) and keep it in the front of the planner for easy access. I place a stencil under the template and apply the ink. You can use one color or blend multiple colors. You can easily write over the Distress Ink and if you want you can add doodles on the stencil during the week.
3. Use large stencils .


I used a large stencil to fill a corner of my planner spread. I used my Dylusions Paints and applied them with the Ranger Blending Tools. I used multiple colors and blended them on the page. The paint does not effect the planner pages and when dry is easy to write on during the planning stage.
4. Stamp sentiment or picture stamps directly onto the spaces.


I used black StazOn. Now you can either color them while designing your page or color during the week. I colored mine using my Inktense Pencils. I activated the ink with a bit of water on a small round brush. A water brush would work well for this. The paper of the Happy Planner seems to handle a little bit of water well without buckling or warping. Be sure to test out your planner page with whatever marker or water brush you choose to ensure it doesn’t bleed through or warp.
5.Attach an ATC ( Artist Trading Card) onto each weekly spread.


Alternatively I am using some pre-done backgrounds that were on ATCs and adding quotes. I have a binder full of inspirational quotes that I found on Pinterest. I typed them up and printed them in various sizes and fonts.
I hope you try some of these on your planner. Subscribe to my blog and you won’t miss upcoming Planner Hacks. 5 more coming next month.
CreativeKady
VISIT MY AMAZON STORE- I’ve done the work for you and organized my store by categories.Everything I chose is CreativeKady approved- I either own it OR want to own it. http://astore.amazon.com/creativekad05-20
Items featured in doing these planner hacks
Dylusions Paints http://amzn.to/2ckMYrw
Dylusions set 2 http://amzn.to/2cfNLeY
Distress Ink http://amzn.to/2kFIRKR
Distress Ink http://amzn.to/2kFFwez
Distress Ink http://amzn.to/2kziN4Q
Ranger Blending Tool- http://amzn.to/2diftK0
Stabilo All Pencil Black- http://amzn.to/2aU33cB
Gelli plate – http://amzn.to/2cfMfcG
Stampendous Peacock- http://amzn.to/2eX6D1K
Dragonfly http://amzn.to/2k5G65A
Penquin http://amzn.to/2k5CBMF
Hummingbird http://amzn.to/2kbvKn6
Peacock Feather TCW- http://amzn.to/2gd6EEy
Kite Peacock Feather- http://amzn.to/2fTgUfU
Sakura Gelly Roll Pens Metallic – http://amzn.to/2eMxbFP


Love these ideas.
LikeLike
Thanks so much Lynn. Hope you give some of them a try and have great success. Karen
LikeLike
I see your amazon store is amazon.com and I am set up to use amazon.ca when i order anything from amazon …. so how can i access your store so you get the credit?
LikeLike